Your Twitch stream key is the unique code that links your broadcasting software—like OBS or Streamlabs—directly to your Twitch channel. It's essentially the secret handshake that proves to Twitch that you are the one authorized to go live on your account. Keeping this key under lock and key is the single most important thing you can do to protect your channel.
Understanding Your Digital Studio Key
At its core, your stream key is a bridge. Your computer and encoder software are busy creating your video feed, but that feed needs a specific destination. The stream key is what tells Twitch's servers, "Hey, this live video goes to this specific channel." Without it, your stream would have nowhere to go.
As you can see in the official warning from Twitch, they couldn't be clearer: never share your key with anyone. This one rule is the bedrock of your channel's security.
Here's a simple way to think about it: Your Twitch channel is a locked-down TV studio. Your streaming software (OBS, Streamlabs, etc.) is the camera crew ready to roll. The stream key is the one-of-a-kind keycard that lets your crew into the studio to start the broadcast. If anyone else gets ahold of that keycard, they can waltz right in and hijack your show.
To give you a quick overview, here’s a simple breakdown of what your stream key is and what it does.
Twitch Stream Key at a Glance
| Attribute | Description |
|---|---|
| Function | Authorizes your streaming software to send a video feed to your specific Twitch channel. |
| Uniqueness | Each Twitch account has its own unique, private key. |
| Privacy | Critical. Should never be shared publicly or with anyone, ever. |
| Location | Found in the "Stream" section of your Creator Dashboard settings on Twitch. |
| Reset | Can be reset at any time, instantly invalidating the old key. |
This table covers the basics, but let's dig into why keeping that key private is a hill worth dying on.
Why This Key Is So Important
The privacy of your stream key is absolutely non-negotiable. If someone else gets their hands on it, they can stream whatever they want directly to your channel, under your name, to your audience.
This could easily lead to content that violates Twitch's Terms of Service, putting you at risk for a temporary suspension or even a permanent ban. It's a scary thought, but it happens.
Securing this key is a fundamental practice for every single one of the 7.23 million active streamers on Twitch as of April 2024. This massive, vibrant community depends on this simple security measure to keep control over their hard-earned channels.
This key is also your ticket to going live, whether you're streaming in real-time or broadcasting a pre-recorded video. The technical setup is identical, but you can always explore the pros and cons of live versus pre-recorded video to fine-tune your content strategy.
As a creator, protecting your key means following a few simple but crucial rules:
- Never show your key on screen. A surprisingly common mistake for new streamers is accidentally showing their settings window during a broadcast. Be mindful of what's visible on your desktop.
- Don't share it with anyone. Not your moderators, not your best friend, not someone "from Twitch support" offering to help. No one.
- Reset it immediately if you think it's been compromised. If there's even a tiny chance someone else has seen it, head to your dashboard and hit that reset button. We'll walk through exactly how to do that later in this guide.
Alright, let's get you set up. You know what the stream key is and why keeping it under wraps is so important. Now it's time to actually find the thing.
Don't worry, Twitch doesn't make you jump through a ton of hoops. Your key is tucked away neatly inside your Creator Dashboard—think of it as the backstage area for your entire channel.
First thing's first: log into your Twitch account. Once you're on the homepage, just click your profile icon up in the top-right corner. A little menu will pop down.
Hopping into Your Creator Dashboard
In that dropdown menu, you're looking for the Creator Dashboard. Give that a click. This is your command center for everything related to your stream: analytics, moderation tools, monetization—it all lives here.
Now that you're in the dashboard, scan the menu on the left side of your screen.
- Look for a Settings tab.
- Click it, and a few more options will appear.
- From that new list, select Stream.
You've found it. This is the spot where Twitch keeps the most critical settings for your broadcast, including that all-important stream key.
Finding and Copying Your Key
You’ll see a field labeled Primary Stream Key right at the top of this page. Notice how it’s hidden by default? That's a good thing. It's a simple but effective security measure to stop someone from snagging it if they're looking over your shoulder or if you accidentally show your screen while live.
You have two options here: Show and Copy. For just about every situation, you'll want to use the Copy button. It's the safest way to handle your key. Clicking it instantly copies the entire string to your clipboard without ever revealing it on screen.
Seriously, Read This: Never, ever click the "Show" button while you're streaming or recording your screen. Accidentally flashing your stream key is a surefire way to get your channel hijacked. Stick to the "Copy" button—it's your best friend here.
With the key copied to your clipboard, you're ready to paste it into your streaming software like OBS or Streamlabs. Just remember to treat this key like a password. Don't share it, don't post it, and definitely don't read it out loud on stream.
Getting Your Stream Key into Your Broadcasting Software
Alright, you've got your Twitch stream key copied and ready to go. Now for the fun part: plugging it into your broadcasting software so you can actually go live. This is the crucial step that connects your computer directly to your Twitch channel, and thankfully, it's pretty straightforward.
Most popular encoders today, like OBS Studio and Streamlabs, give you two main ways to get set up. You can either log into your Twitch account directly through the software—which is usually the easiest route—or you can manually paste in the stream key for more control.
This visual gives you a quick reminder of the steps to find your key before you dive into your software settings.
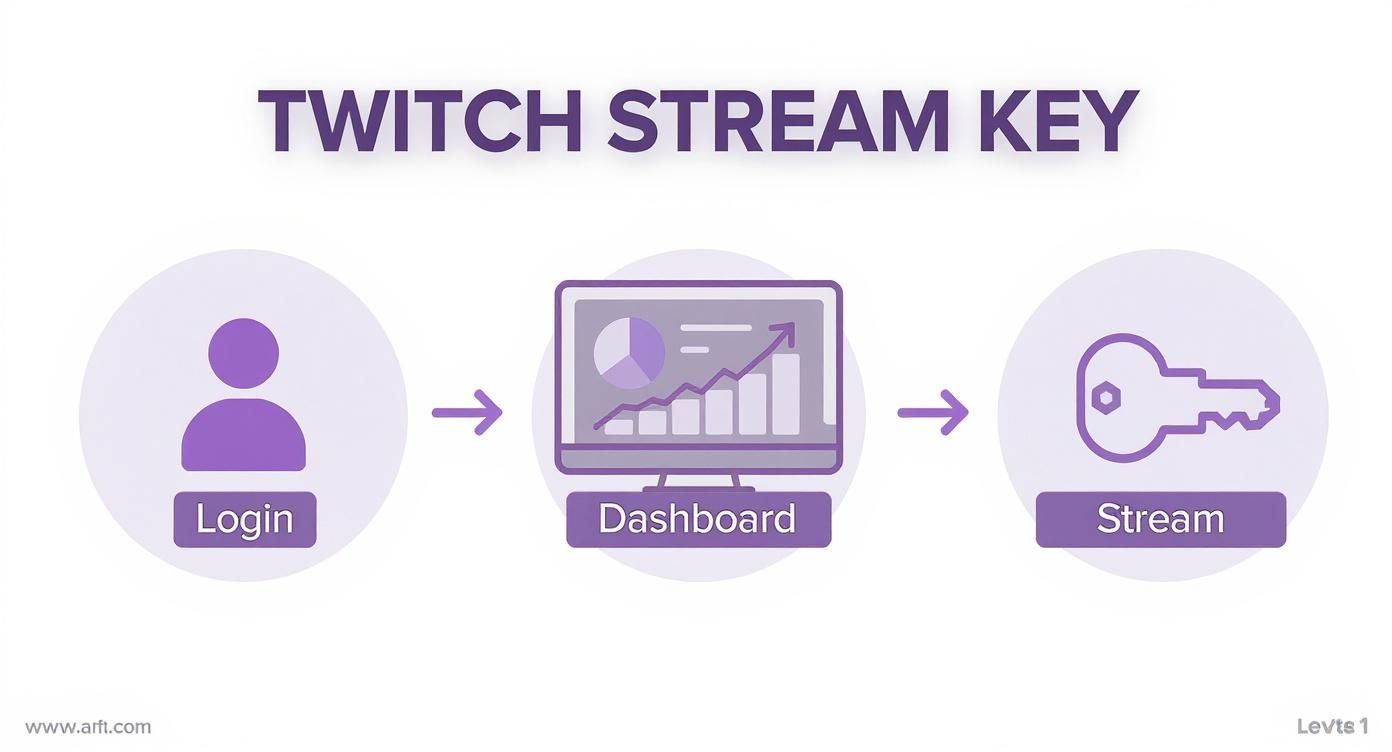
It’s really just a three-part journey: log in, head to your Creator Dashboard, and grab the key from your settings. Simple as that.
Before we jump into specific software, let's quickly compare the two main connection methods. Each has its own set of advantages depending on your needs.
Encoder Connection Methods Comparison
| Connection Method | Pros | Cons |
|---|---|---|
| Direct Account Login | - Easiest setup: No copying or pasting needed. - Integrated features: Unlocks Twitch-specific docks like chat and activity feeds directly in your software. |
- Less portable: Tied to a specific software instance. - Requires granting permissions: You have to authorize the software to access your Twitch account. |
| Manual Stream Key | - Universal: Works with any RTMP-compatible software. - More control: You decide exactly where your stream goes without granting broad account access. |
- Requires manual entry: You have to copy and paste the key each time you set up a new instance. - No integrated features: You won't get the built-in Twitch chat or other docks. |
For most streamers, the direct account connection is the way to go because it's so convenient. But knowing how to use the manual key method is a valuable skill, especially if you ever use less common software or need to troubleshoot.
Setting Up OBS Studio
OBS Studio is a workhorse in the streaming world. It's free, powerful, and incredibly flexible. Getting it connected to Twitch is a breeze.
When you first launch OBS or head into Settings > Stream, you’ll see a "Service" dropdown. Just select "Twitch." From there, the software gives you the choice: "Connect Account (recommended)" or "Use Stream Key."
If you choose to connect your account, OBS will open a browser window for you to log into Twitch. This is great because it automatically pulls in your stream key and adds helpful Twitch-specific panels, like your chat and activity feed, right into the OBS interface.
If you prefer the manual route, just select "Use Stream Key," paste your Twitch stream key into the field, and you're all set.
Using Streamlabs Desktop
Streamlabs Desktop (formerly Streamlabs OBS) is built on the same foundation as OBS but with a focus on a more beginner-friendly experience and built-in features like alerts and widgets.
The process is very similar. When you first install Streamlabs, it will guide you to connect your Twitch account. This is definitely the recommended path here, as it's the only way to get access to the full suite of integrated tools that make Streamlabs so popular.
But if you ever need to enter the key manually, here’s how:
- Click the Settings cog in the bottom-left corner.
- Head over to the Stream tab.
- Make sure the "Service" is set to Twitch.
- Paste your key into the "Stream Key" field.
This flexibility is what allows creators to broadcast such a wide array of content. As of May 2025, Twitch hosted streams across a staggering 46,371 different categories. Your stream key is the universal pass that lets you jump between gaming, art, music, or just chatting, all with the same secure connection.
Browser-Based and RTMP Studios
What if you're not using desktop software? Many streamers use browser-based tools or platforms for simulive streaming (broadcasting pre-recorded videos as if they were live). For these, you'll need two pieces of information: the RTMP URL and the Stream Key.
Think of the RTMP URL as the main address of the streaming server, like a street address. Your stream key is the specific key to your apartment at that address. You need both to ensure your stream gets delivered to the right place.
In your platform's settings, you'll find two fields:
- RTMP URL: For Twitch, this is typically
rtmp://live.twitch.tv/app. Some tools may help you find the best regional server for you. - Stream Key: This is where you paste that unique key you copied from your Twitch dashboard.
This RTMP method is a fundamental skill for any serious streamer, especially if you plan to multistream to different platforms at once. For instance, the steps to live stream to Facebook are nearly identical—you just grab the RTMP info from your Facebook Page instead. Once you've got the hang of it for Twitch, you can broadcast almost anywhere.
When and How to Reset Your Stream Key
Your Twitch stream key is the digital key to your broadcast studio. Most of the time, you can just set it and forget it. But there are moments when resetting that key is absolutely critical to protect your channel, your content, and your community.
Knowing when to hit that reset button is just as important as knowing where to find the key in the first place.
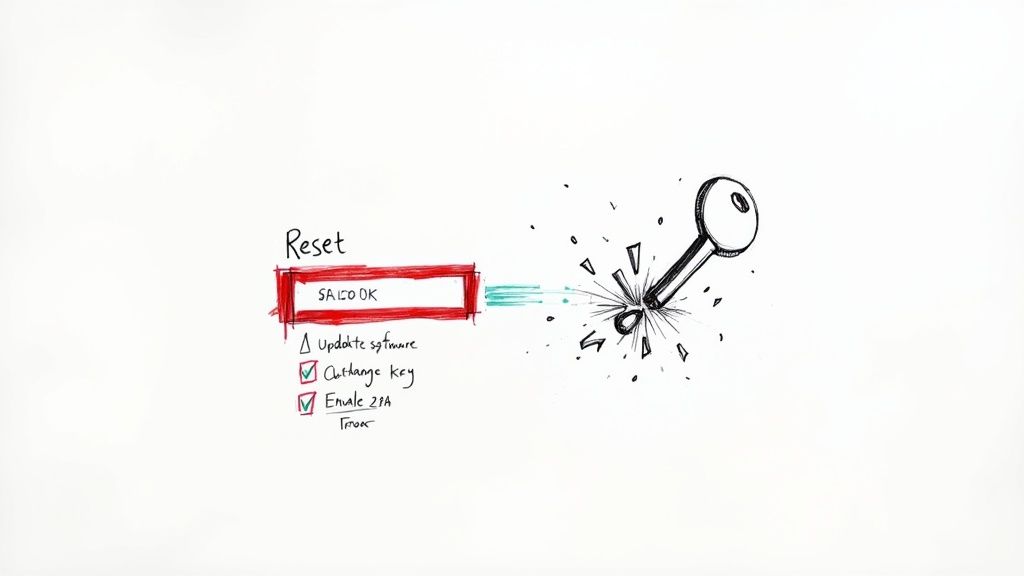
Think of it like changing the locks on your house. A reset instantly makes the old key obsolete, cutting off access for anyone who might have gotten their hands on it. This simple click is your best line of defense against someone hijacking your stream.
Key Scenarios Demanding a Reset
So, when is it time to change the locks? You don’t need to do this every week, but certain situations call for immediate action. Being proactive can save you from a major headache, like getting your account suspended for something you didn't even stream.
Here are a few real-world examples that should be a clear signal to reset your key:
- Accidental Leaks: You’re live, tinkering with settings, and your Creator Dashboard flashes on screen for a millisecond. That's all it takes for someone to grab a screenshot. Reset it.
- Shared Access Ends: Maybe you let a friend or a production partner use your key for a special event or a collab stream. The moment that project wraps up, reset your key to revoke their access.
- Suspicious Activity: You see something weird happening with your account, or you think your PC might have picked up some malware. Resetting your key should be one of your first steps to lock things down.
- Using a Different PC: You streamed from a computer that wasn't your own—like at a gaming convention or a friend's house. As soon as you're back at your own rig, reset the key.
Pro Tip: Whenever you work with a collaborator, make "reset stream key" a standard part of your offboarding checklist. It’s a simple habit that prevents future mix-ups or security risks.
How to Perform the Reset
Twitch couldn't have made this any easier. The reset button is right where you'd expect it to be—in the same spot where you find your key.
Head back to your Creator Dashboard, then click through to Settings > Stream. You'll see the Reset button sitting right next to your hidden Primary Stream Key.
Click it, and Twitch instantly generates a brand new, unique key for your channel. At that very moment, the old one is toast.
Now for the most important part: you must copy this new key and paste it into your broadcasting software. Whether you use OBS Studio, Streamlabs, or another encoder, it won't be able to connect to Twitch until you give it the new key. If you forget this step, your next stream just won't go live.
And while you're focused on security, do yourself a favor and enable Two-Factor Authentication (2FA) on your Twitch account. It adds a powerful extra layer of defense against anyone trying to gain access.
What to Do When Your Stream Key Isn't Working
It happens to everyone. You hit "Start Streaming," everything looks good on your end, but then you get that dreaded "Failed to connect to server" error. Or maybe your software says you're live, but your Twitch channel is stubbornly offline. Nine times out of ten, a simple issue with your Twitch stream key is the culprit.
Don't panic. These hiccups are usually a quick fix. Before you start digging into complicated network settings, let's run through a quick diagnostic checklist and get you back online.
Start With the Obvious: The Key Itself
I can't tell you how many times a full-blown streaming crisis turned out to be a simple copy-paste mistake. It’s the first place you should always look.
Go back to your Twitch Creator Dashboard and grab a fresh copy of your stream key. Then, head over to your streaming software settings and paste it in. Make absolutely sure there are no extra spaces hanging around at the beginning or end—even one wrong character will stop the connection cold.
Here's a classic scenario I see all the time: A streamer resets their key for security reasons but completely forgets to update it in their OBS or Streamlabs profile. Always double-check that the key in your software is the current one from your dashboard.
Check Your Connection and Server Settings
If you're 100% positive the key is correct, the next stop is your encoder's connection settings. Your software needs both the right key and the right server address to talk to Twitch.
Here’s what to look for:
- Server Selection: Dive into your software's stream settings. Is the Twitch server set to "Auto"? If not, it should be. This lets the software pick the best server based on your location, giving you a more stable connection. If you've manually set one, make sure it's the one geographically closest to you.
- Firewall & Antivirus: Sometimes, your own security software can be a little too protective and block the connection. Try temporarily disabling your firewall or antivirus and see if the stream connects. If it does, you've found the problem. Just add an exception for your streaming software so it doesn't happen again.
- Internet Stability: Is your internet connection acting up? A quick speed test will tell you if your upload speed is stable. A choppy connection can cause authentication to fail over and over.
This whole key system is what allows Twitch to manage its mind-boggling scale. Think about it—the platform handles over 57,280 live channels at any given moment and accounts for a massive 61% of all live-streaming hours watched worldwide. With over 28.5% of internet users watching live content every week, that security has to be rock-solid. If you're curious about the numbers, you can discover more insights about live streaming statistics on BloggingWizard.
Ultimately, a methodical approach is your best friend here. Start with the key, then move to your software and network. By tackling the most common issues first, you'll find the problem and get back to your community in no time.
Common Questions About Twitch Stream Keys
Once you start digging into the technical side of streaming, a few questions about your Twitch stream key almost always pop up. It’s a simple concept on the surface, but a few specific situations can throw new streamers for a loop. Let's break down the most common ones I hear.
The biggest one is always about security. Let me be crystal clear: never, ever share your primary stream key. Giving it to someone is like handing them the keys to your entire channel. They can broadcast whatever they want, which could easily lead to content strikes or even a permanent ban from Twitch. Treat it like your bank account password. Seriously.
How Your Stream Key Works
A lot of new streamers wonder if their key changes every time they go live. Nope. Your primary Twitch stream key is static, meaning it stays the same until you go in and manually reset it yourself. This is great for convenience—you set it up once in your streaming software and you're good to go. But it also puts the responsibility for keeping it safe squarely on your shoulders.
Another common point of confusion is the difference between the stream key and the server URL. They work together, but they do very different jobs.
- Server URL (RTMP URL): This is the public address for the Twitch server you’re sending your video feed to. Think of it as the mailing address for Twitch's main broadcast building.
- Stream Key: This is your private, unique code. It tells the server which specific channel—your channel—the video belongs to. It's the key that unlocks your personal studio door inside that main building.
You absolutely need both to get your stream connected, especially if you're using software or tools that require you to enter the RTMP information by hand.
Key Takeaway: The RTMP URL gets your stream to Twitch's front door. Your stream key tells them which room to deliver it to. One without the other won't work.
Using Keys with Multistreaming Services
So, what happens when you want to multistream to Twitch and YouTube at the same time? This is where services that handle simulcasting come in handy. They actually make this whole key management thing much simpler.
Instead of you juggling different keys for different platforms, the service does all the heavy lifting on the back end. You'll give your Twitch stream key to the multistreaming platform just once when you set up your account. After that, you just stream to their RTMP server, and their system automatically pushes your broadcast out to all the platforms you've linked.
This is a totally standard and secure way to do things, provided you're using a trusted, well-known service. It's a fantastic way to grow your audience, and if you want more growth strategies, feel free to check out our full collection of streaming guides over on the blog.
Just do your homework first. Before you hand over your key to any third-party tool, read some reviews and make sure they have a good reputation for keeping user credentials safe. A few minutes of research can save you a massive headache down the road and keep your channel secure as you expand your reach.
Ready to broadcast your perfected videos without the stress of going live? Pre-recorded LiveStream lets you schedule pre-recorded content to go live on Twitch, YouTube, and more, so you can engage with your chat while our cloud-based platform handles the technical heavy lifting. Learn more and start your first stream today at Pre-recorded LiveStream.