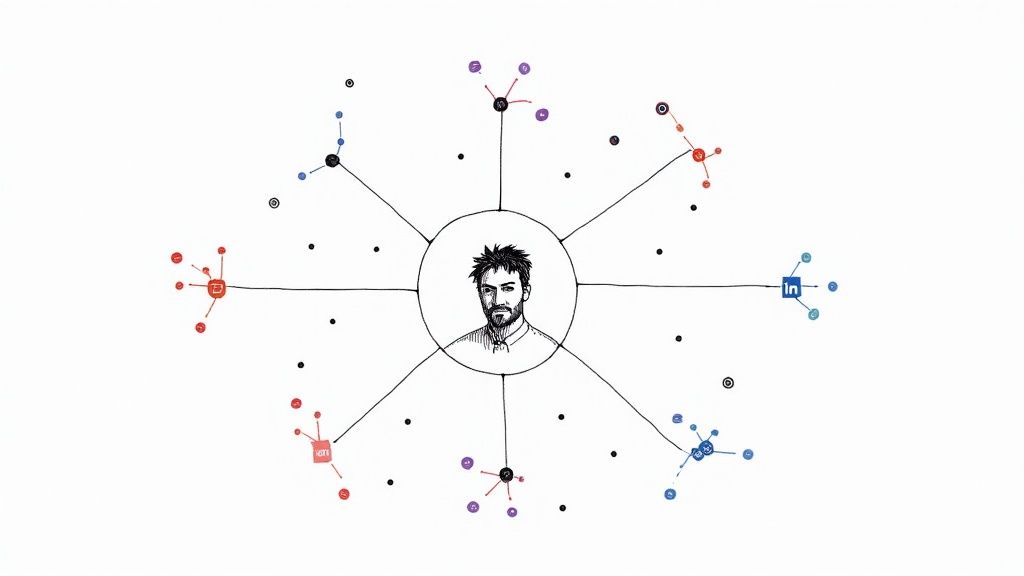
Want to get your stream in front of more people? The secret is to stream to multiple platforms at the same time. This is called multistreaming, or sometimes simulcasting, and it’s a powerful way to send a single video feed out to YouTube, Twitch, Facebook, and wherever else your audience hangs out.
Instead of creating unique content for every single channel, you can maximize your reach with one broadcast. It's hands-down the most efficient way to grow your brand.
Why Multistreaming Is a Game-Changer
Before we get into the nuts and bolts, let's talk about why this is such a smart move. Going live everywhere isn't just about getting more eyeballs; it's about building a smarter, more resilient content strategy. I’ve seen too many creators feel trapped on one platform, but simulcasting opens up growth opportunities they never thought possible.
Thinking about expanding your digital footprint? Here's why you should seriously consider multistreaming:
- Find New Audiences: Every platform has its own vibe and demographic. If you're a gamer, you've probably built a great community on Twitch. But that same stream could find a completely different, algorithm-fed audience over on YouTube.
- Don't Put All Your Eggs in One Basket: Relying on a single platform is a huge risk. We've all seen it happen—an algorithm changes, a new policy drops, or the platform just loses steam, and suddenly a creator's reach is decimated. Multistreaming is your safety net.
- More Ways to Make Money: Broadcasting to multiple channels opens up different revenue streams simultaneously. You could be earning from YouTube's Super Chats, Facebook's Stars, and Twitch's Bits—all from the very same live event.
Tap Into a Booming Market
Live streaming isn't some niche hobby anymore; it's a massive part of the media landscape. The industry is exploding, driven by huge audiences and new ways for creators to earn a living.
The live streaming market hit roughly $100 billion in 2024, which is nearly four times what it was just five years ago. Projections show it could climb to $345 billion by 2030. With about one out of every four people online watching live streams each week, sticking to a single platform means you're leaving a massive, engaged audience behind. You can dig into more of these stats in a full report on live streaming trends from Teleprompter.com.
The real power of multistreaming isn't just about being seen everywhere at once. It's about building a strong, cross-platform community that will follow you anywhere, protecting your brand from the ups and downs of any one social network.
Meet Your Audience Where They Already Are
Think about it this way. Let's say you're hosting a live workshop for your business. By streaming it to LinkedIn, you’re reaching professionals actively looking for industry knowledge. At the same time, broadcasting on Facebook can pull in a more casual, community-focused crowd.
You're delivering the same core message, but it lands differently and reaches different mindsets without any extra work on your part. A single-platform strategy just can't compete with that kind of efficiency. Your audience is already scattered across these services; multistreaming is simply the bridge that brings your content to them.
Deciding to go live on multiple platforms at once is the easy part. The real work begins when you have to choose how you're going to pull it off. This is probably the most critical decision you'll make, as it shapes your entire workflow, budget, and the final quality of your broadcast.
You've basically got three paths to choose from. Think of it this way: are you a solo creator who needs something that just works, or are you running a full-blown production that needs rock-solid stability? Your answer will point you toward the right tool for the job, whether that's a cloud service, a piece of software, or a dedicated hardware box.
Let's dig into each one so you can make a smart choice.
Cloud-Based Simulcasting Services
For most people, especially if you're just getting your feet wet with multistreaming, a cloud-based service is the perfect starting point. Platforms like Restream, Castr, or our own Pre-recorded LiveStream all work on a simple but powerful idea: you send one single, high-quality stream from your computer to their servers, and they do all the heavy lifting.
From their cloud infrastructure, they duplicate your stream and push it out to all the destinations you've connected—YouTube, Facebook, Twitch, you name it.
The biggest win here? This method puts almost no extra strain on your computer or your internet connection. Your machine only has to worry about encoding and uploading one video feed, just like you would for a normal, single-platform stream. This makes it incredibly accessible, even if you don't have a beast of a PC or a super-fast internet plan.
If you value simplicity and efficiency above all else, this is your best bet.
Dedicated Multistreaming Software
The next option is to handle everything right from your own computer using software. This could be a broadcasting app that has multistreaming built-in or a special plugin for a program you already use, like the popular OBS Studio. Unlike a cloud service, this approach forces your computer to encode and upload a separate, unique stream for every single platform.
So, if you’re streaming to three platforms at 6,000 kbps each, your machine and internet have to consistently push out a total of 18,000 kbps (18 Mbps). This is no small feat and requires a powerful PC and a beefy internet connection to avoid dropped frames and buffering.
For those with the right hardware, this route gives you granular control over each stream's settings and helps you avoid monthly subscription fees. It's a much more hands-on, technical path. If this sounds like it might fit your setup, you can check out some of the best free live streaming software to see what's out there.
The choice between cloud and software really boils down to a trade-off. With a cloud service, you pay a subscription for convenience and lower resource demands. With software, you trade higher demands on your PC and internet for more control and no recurring fees.
Standalone Hardware Encoders
At the very top of the food chain, you'll find hardware encoders. These are dedicated physical devices—small boxes from brands like Teradek or Blackmagic Design—that have one job and one job only: take a video feed and stream it online. Because they are purpose-built, they are incredibly reliable.
Hardware encoders completely take the encoding workload off your computer, freeing up its CPU and GPU for other tasks. This is exactly why they're the standard for professional broadcasts, major live events, and any situation where the stream simply cannot fail. A big virtual conference or a live sporting event would absolutely rely on a hardware encoder for its unmatched stability.
While this is the most bulletproof way to multistream, it's also the priciest. Professional units can run you hundreds, if not thousands, of dollars. It’s an investment that makes sense for serious businesses or creators who need true broadcast-level dependability. And remember, no matter which method you choose, you'll want to promote your streams ahead of time using powerful social media scheduling tools like Publer and Later.
Comparison of Multistreaming Methods
Choosing the right tool can feel overwhelming, so I've put together this table to give you a quick, head-to-head look at the three main methods. It breaks down who each option is best for, the key pros and cons, and what you can expect to spend.
| Method | Best For | Pros | Cons | Typical Cost |
|---|---|---|---|---|
| Cloud Service | Beginners, creators with average PCs, and those prioritizing ease of use. | Low strain on PC/internet, simple setup, accessible from anywhere. | Monthly subscription fees, less control over individual streams. | $10 - $100 / month |
| Software | Tech-savvy creators with powerful PCs and fast, stable internet. | High degree of control, often free or a one-time cost. | High CPU usage, requires significant upload bandwidth. | Free - $200 (one-time) |
| Hardware | Professional productions, live events, and broadcasters needing maximum reliability. | Extremely stable and reliable, frees up PC resources completely. | High upfront cost, can be complex to configure. | $300 - $5,000+ (one-time) |
Ultimately, the best choice depends entirely on your specific goals, budget, and technical setup. A beginner streamer has very different needs than a professional broadcast studio, and thankfully, there's a solution for everyone.
Configuring Your Streaming Workflow
Alright, you've picked your multistreaming weapon of choice—cloud service, software, or a dedicated hardware box. Now comes the fun part: getting everything wired up and ready to go live. This is where the rubber meets the road, turning your plan into a real, working broadcast. Think of it as setting up the digital plumbing that's going to carry your stream out to all your different audiences.
Let's get our hands dirty. We're going to cover everything from wrangling RTMP URLs and stream keys to dialing in the perfect encoder settings. The goal here is to sidestep all those common day-one headaches—dropped frames, bad audio, pixelated video—before you even think about hitting that "Go Live" button.
This diagram lays out the three main ways you can tackle multistreaming.
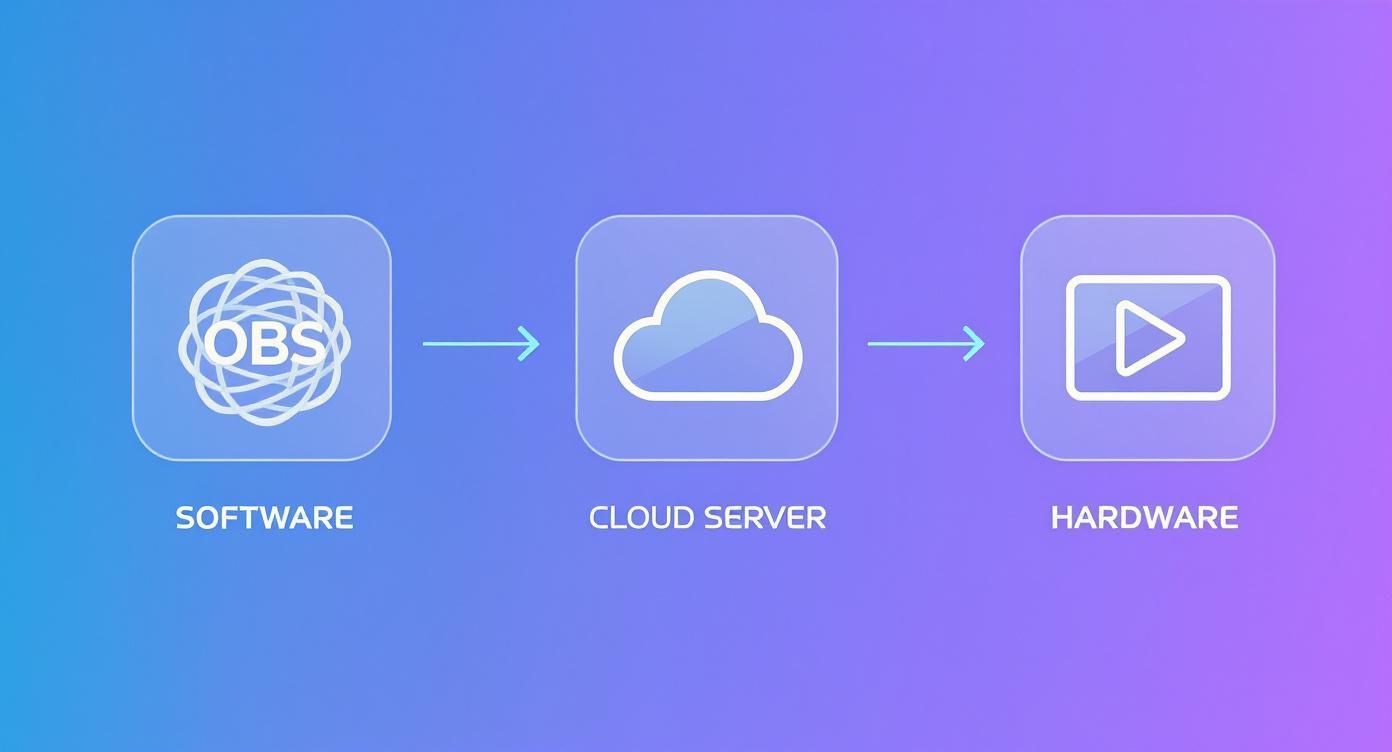
Each path has its own trade-offs between how much control you have, how easy it is to set up, and what it costs. This gives you the flexibility to find the perfect fit for your specific needs.
Mastering RTMP URLs and Stream Keys
The absolute backbone of any live stream is the RTMP (Real-Time Messaging Protocol) connection. It’s the standard technology that pushes your video and audio from your encoder—whether that's OBS, a cloud tool, or a physical device—to platforms like YouTube or Twitch. To make that connection happen, you need two key pieces of information for every single platform you want to stream to.
- RTMP URL (or Server URL): This is just the address for the platform's server that's going to "catch" your stream. For example, YouTube’s main server address is
rtmp://a.rtmp.youtube.com/live2. - Stream Key: This is a long, unique string of characters that acts like a password. It tells the platform's server that the stream it's receiving belongs to your channel. Never, ever share your stream key publicly. If someone gets it, they can stream directly to your channel.
Finding these is usually pretty simple. On platforms like Twitch, YouTube, and Facebook Live, you'll find them buried in your creator dashboard or live control room. Just copy and paste both the URL and the key into your streaming software or cloud service for each destination.
Pro Tip from the Trenches: When you copy your stream key, be extra careful not to grab any extra spaces at the beginning or end. I've seen a single misplaced space cause a connection to fail, which is an incredibly frustrating problem to troubleshoot.
Optimizing Your Encoder and Bitrate Settings
Once your destinations are locked in, it's time to tweak your encoder settings. This is a balancing act between video quality and what your internet connection can realistically handle. The single most important setting to get right is your video bitrate. Measured in kilobits per second (kbps), this number dictates how much data you're sending every second.
A higher bitrate means a cleaner, crisper picture, but it also puts more strain on your upload speed. If you set it too high for your connection, you'll start dropping frames, resulting in a stuttery, unwatchable mess. On the flip side, a bitrate that's too low will make your stream look blurry and pixelated, especially during fast-paced action.
For a solid 1080p stream at 60 frames per second (fps), a good starting point is somewhere between 6,000 to 8,000 kbps for most major platforms. If you're streaming at 720p, you can probably get away with 3,500 to 5,000 kbps.
But remember, these are just guidelines. The perfect number depends entirely on your upload speed.
A reliable rule of thumb is to never use more than 75% of your available upload bandwidth for your stream. That leaves a healthy buffer to handle any random network hiccups without your stream dying.
For a much deeper dive, this is a fantastic guide to choosing the right bitrate for streaming.
Preparing Pre-Recorded Content for Simulive
Not all multistreams need to be a live-wire act. Broadcasting a pre-recorded video as if it's happening live—a technique we call 'simulive'—is a powerful and surprisingly popular strategy. It lets you polish your content to perfection, add slick graphics, and edit out any mistakes, all while getting the audience engagement and reach of a live event.
You can queue up a video file in software like OBS by adding it as a "Media Source," which lets you broadcast it just like a live camera feed.
To get your video ready for a simulive broadcast, follow these best practices:
- Match Your Export Settings: Render your final video using the exact same specs you plan to stream with. If your target is a 1080p, 60fps stream at 8,000 kbps, then export your video file with those precise settings.
- Stick to Standard Formats: The MP4 container with H.264 video encoding and AAC audio is your safest bet. It's the universal language of video and will play nice with virtually any platform or software you throw at it.
- Check Your Audio Levels: Normalize your audio to a consistent level, usually somewhere around -3 to -6 dB. This simple step prevents your audio from being painfully loud or frustratingly quiet, ensuring a good listening experience for everyone, no matter if they're using studio headphones or their phone's tiny speakers.
Nailing your workflow configuration from the get-go is what separates a smooth, professional broadcast from a stressful, technical nightmare. Getting this foundational work done allows you to stop worrying about the tech and focus on what actually matters: creating great content and connecting with your community.
Managing Engagement Across Platforms
So you're live on YouTube, Twitch, and Facebook all at once. That's a huge win, but it's really only half the job. The real challenge—and where the magic truly happens—is turning those separate chat rooms into one big, lively conversation. Trying to keep up with comments flying in from three different places can feel like you're spinning plates, but it’s totally manageable with the right approach.
This isn't about frantically clicking between browser tabs. It's about using smart tools and a solid strategy to make every single viewer feel like they're part of the main event, no matter where they're watching from. This is how you transform a scattered audience into a loyal, cross-platform community.
Unify Your Chat Feeds
First things first: you need to get all your chats into one place. Trying to watch multiple chat windows is a recipe for a headache and missed messages. Many of the cloud-based multistreaming tools have a built-in unified chat overlay, and honestly, it’s a non-negotiable feature for me.
This feature pulls all the comments from every platform you're streaming to into a single, scrolling feed. You’ll see a little icon next to each message—a YouTube logo, a Twitch emote—so you know exactly where it’s coming from. Suddenly, you're not juggling three separate conversations; you're just talking to your community, all in one spot.
Getting your chat unified is the foundation. It turns engagement from a technical chore into a natural, seamless part of your stream.
Acknowledge Viewers and Foster Inclusivity
Okay, so you’ve got one chat feed. Now what? The key is to make your interactions feel personal and inclusive. A simple trick I’ve found incredibly effective is to just call out where people are watching from.
- Shout-Outs by Platform: Make a habit of saying things like, "Great question from Sarah over on YouTube!" or "Appreciate the follow, Mark, tuning in from Twitch!" This little acknowledgment does two big things.
- It Builds Community: Viewers feel seen and recognized. Plus, it shows everyone that you’re managing a cool, diverse audience from all over.
- It Cross-Promotes Your Channels: It’s a subtle reminder to your Twitch viewers that you also have a YouTube channel, and vice-versa. This is a great way to get people to follow you in more than one place.
The whole point is to tear down the invisible walls between your audiences. When someone on Facebook sees you interacting with a comment from Twitch, they stop feeling like they’re in a silo. They start feeling like part of one big, connected community.
Manage Platform-Specific Monetization
Beyond the standard "hello" in chat, each platform has its own way for viewers to show support—YouTube has Super Chats, Facebook has Stars, and Twitch has Bits. These are high-priority alerts. You absolutely cannot afford to miss them.
Most unified chat tools are great about making these donations stand out with special colors or animations, so they’re hard to ignore. Have a plan for how you'll thank people immediately and with real enthusiasm. A missed Super Chat isn't just a missed "thank you"; it's a signal to everyone else that their support might go unnoticed, too.
The way people watch content is spreading out more every day. In a major milestone, streaming video viewership officially surpassed the combined total of broadcast and cable TV for the first time in May 2025. Nielsen's data showed streaming captured 44.8% of total TV viewership, and the number of major platforms doubled from five to eleven in just a few years. This diversification makes a unified engagement strategy more crucial than ever.
For more on driving interaction across all your channels, check out these tips on how to improve social media engagement.
Pro Tips for a Flawless Multistream
Getting your stream live on multiple platforms is a huge win. But going from a functional stream to a truly professional broadcast is all about the details—the little things that prepare you for chaos and make your audience feel right at home. It’s about being proactive, not reactive.
These are the strategies I’ve learned over years of streaming that separate the amateurs from the pros, helping you build a broadcast that's smooth, engaging, and rock-solid every single time.
Build a Bulletproof Backup Plan
Let's be honest: the single biggest fear for any streamer is the internet connection dying mid-stream. One flicker and your broadcast collapses everywhere, leaving viewers with that dreaded spinning wheel. This is why a failover or backup stream isn't a luxury; it's an absolute necessity for serious streaming.
A failover is just a fancy term for a second, ready-to-go stream that kicks in the moment your main one drops. It takes some planning, but the peace of mind is priceless.
- Bonded Cellular: For those can't-fail events, services that merge several cellular signals (from different carriers like Verizon, AT&T, etc.) create an incredibly stable internet connection that’s completely separate from your home or office network.
- Secondary ISP: If you can swing it, having a second internet line from a different provider (like cable if you already have fiber) is a fantastic way to guarantee a totally separate backup.
- Mobile Hotspot: Never underestimate a good 5G mobile hotspot. In a pinch, it can absolutely keep you live while you figure out what's wrong with your primary connection.
The goal here is to get rid of any single point of failure. You hope you never need it, but a solid backup plan is the best insurance policy you can have when you stream to multiple platforms.
I once had my main fiber connection drop mid-webinar due to a neighborhood outage. My pre-configured 5G hotspot automatically took over via a dual-WAN router, and the stream only stuttered for about three seconds. Most of the audience didn't even notice—that's the power of having a plan B.
Master Your Audio and Visuals Per Platform
Not all platforms have the same culture, so why should your stream look and sound identical everywhere? A one-size-fits-all approach feels lazy. To really connect with your viewers, you've got to customize the experience for each destination.
For instance, your YouTube audience might prefer clean, minimal overlays. Meanwhile, your Twitch community probably expects high-energy, meme-filled alerts. Using software like OBS Studio, you can create different scene collections or install plugins that trigger platform-specific visuals. It's a small touch that shows you actually get the platform you're on.
Advanced audio routing is another pro move. Imagine sending a clean, professional audio mix to LinkedIn while your Twitch feed gets a separate mix with game sounds and background music. This takes a virtual audio mixer like Voicemeeter Banana or a hardware solution, but the level of control it gives you is incredible.
Analyze and Adapt with Post-Stream Analytics
The work isn't done when you hit "Stop Streaming." The data you get afterward is a goldmine. Seriously, take the time to dive into the analytics dashboards on YouTube, Twitch, Facebook, and everywhere else you stream.
Keep an eye on a few key metrics:
- Peak Viewership: At what point did the most people tune in? What were you talking about or doing at that exact moment?
- Average Watch Time: How long did viewers actually stick around on each platform? If your watch time is tanking on Facebook, that content might not be a good fit.
- Engagement Rate: Don't just look at views. Compare the comments, likes, and shares across your channels to see which community is truly interacting.
This data lets you make smart decisions. If you see that 90% of your engagement is coming from your YouTube audience, maybe you should focus on shouting out that chat a bit more next time. Analytics turn gut feelings into a real strategy.
The Essential Pre-Flight Checklist
Never, ever go live without a final check. A simple "pre-flight" checklist will save you from so many easily avoidable on-air disasters. Make this a non-negotiable ritual you run through 15-30 minutes before every single broadcast.
- Internet Speed Test: First things first, check your upload speed. Is it stable? Do you have at least a 25% buffer over your total bitrate? A flaky connection is the cause of most stream problems. We have a full guide on how to improve my upload speed if you're struggling here.
- Audio Level Check: Do a quick local recording. Listen back. Is your mic audio clean? Is it clipping? Are the game or music levels overpowering your voice?
- Platform Connection Test: Look at your streaming software. Does it show a stable connection to all destinations? Are all your RTMP keys entered correctly?
- Scene and Alert Check: Click through every one of your scenes. Trigger a test alert—a follow, a donation, a subscriber—for each platform to make sure they're actually working.
- Monitor Your Output: This is critical. Pull up your own stream on a separate device, like your phone using cellular data (not your Wi-Fi). This is the only way to see and hear exactly what your audience is experiencing.
This disciplined approach is what takes your multistream from a hobby into a professional production your audience can count on.
Answering Your Top Multistreaming Questions
Even after you’ve mapped out a solid multistreaming strategy, a few nagging questions can pop up. It's totally normal. Getting the technical and practical details right is what separates a smooth broadcast from a total mess.
Let's walk through some of the most common questions I get from creators who are about to dive into multistreaming. Nailing these down now will save you a world of hurt later.
Will Multistreaming Hog All My Internet Bandwidth?
This is a big one, and the answer isn't a simple yes or no. It all boils down to how you're multistreaming, a detail that catches a lot of people by surprise. The common assumption is that streaming to more places automatically multiplies your internet usage, but that's not always the case.
Here’s how it breaks down:
- Cloud-Based Services: If you're using a platform like Restream or Pre-recorded LiveStream, you're in luck. Your computer only sends a single high-quality stream up to their servers. From there, they do the heavy lifting of duplicating and sending it out to all your destinations. This means your bandwidth needs are the same as streaming to just one platform. It's incredibly efficient.
- Software-Based Multistreaming: On the other hand, if you're using something like an OBS plugin to manage the multistream directly from your own machine, your computer is pushing out a separate stream for each platform. Streaming to three places at 6,000 kbps means you'll need a rock-solid upload speed of at least 18 Mbps, and that's not even counting a safety buffer. This approach is way more demanding on your home internet.
Am I Going to Get Banned for Multistreaming?
This is probably the most important question on the list, and the answer is a little complicated. For most people, you're completely in the clear. The big exception, however, involves Twitch Affiliates and Partners.
Twitch's exclusivity clause is pretty strict. It says that any "Live Twitch Content" has to stay exclusive to Twitch for a full 24 hours. What this means in plain English is that if you are a Twitch Affiliate or Partner, you cannot stream that same live broadcast over to YouTube, Facebook, or anywhere else at the same time. If you haven't joined those programs, you have nothing to worry about.
Always, always check the latest Terms of Service for every single platform you plan to stream on. These policies can and do change, and pleading ignorance won't save your account if you accidentally break a new rule.
How Do I Pick the Right Bitrate for My Multistream?
Finding the perfect bitrate is a balancing act. You want a sharp, professional-looking video, but you also need a stable stream that doesn't constantly buffer for your viewers. How you approach this depends entirely on your setup.
If you’re using a cloud service, your job is easy. Just send them the absolute best quality stream your internet connection can handle without dropping frames. For most people with a decent fiber connection, that's usually 1080p resolution at 6,000 to 8,000 kbps. The service will take that beautiful stream and automatically adjust it for each specific destination.
Now, if you're streaming directly from your computer, you have to play by the rules of the "lowest common denominator." You'll need to look up the maximum recommended bitrate for each platform you're streaming to and then set your encoder to the lowest of those numbers. For instance, if one platform maxes out at 4,500 kbps while another can take 8,000 kbps, you have to set your stream to 4,500 kbps. This ensures it works everywhere without getting rejected. And remember to leave about a 25% buffer in your upload speed just in case your connection fluctuates.
Want to take the stress and technical headaches out of multistreaming your pre-recorded videos? With Pre-recorded LiveStream, we handle all the heavy lifting. Just upload your video, pick a time, and our cloud platform will simulcast it perfectly to all your favorite channels. Learn more about how Pre-recorded LiveStream can simplify your workflow.